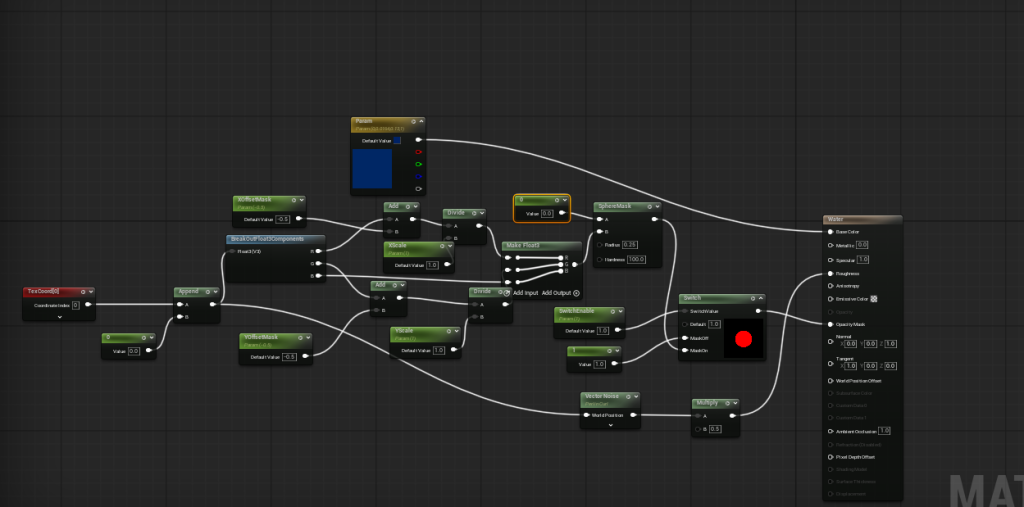
This time I Make a tribute to (steal) a synth sound

This song is great, you should buy and listen to this song.

The primary synth is awsome, I’ve listened to this song like 100 times and it sounded like operator (subtractive synth) so I thought I would give it a shot.

I’m pretty sure I’ve got it 80% of the way there:

Pretty awesome sound, basically it’s a gross as hell chain that then gets some LFO automation on each note.

Here’s me cycling through the operator settings

Pretty awesome I think if I tweaked it further I could get it perfect but ripping someone elses synth is only cool for pure education purporses.

Stream the real song.

Another FPS Model

Spent some time today setting up and rigging an assault rifle for the game.

It’s still kind blocky but any more effort on this would end up being on details that are un-needed. My main goal with my current modeling streak is to rush a bunch of stuff in game to make a simple fps.

It seems to be looking fine in unreal also.

Now that I have two bonified animated weapons in game (I’m aggressive not doing any reloads, just goldeneye style hide weapon reloads) I can start working the enemy side.

I have some ideas but mostly I’m thinking some kind of drones rushing you and moving in inhuman ways. I have a start here but I think I need to redo the legs/locomotion of this guy.

Which I honestly love the idea of a robot that had a gun stupidly stuck to its head by a redneck super-villian. But the more I look at this guy the more simplistic it seems. I was going for capturing the vibe of modern robotic arms (such as: https://www.devonics.com/product-page/ufactory-xarm-5?utm_source=reachlocal&utm_medium=cpc&utm_campaign=googleshoppingdevonicsincroboticarms&gad_source=1 ) but I don’t think they actually look as cool as I wanted.

I am, however, proud of this top portion:

Maybe not so in execution but definitely in concept. I could take down some of the work I need to do if I just re-use models on the enemies. If I get a good single enemy variant down I can just throw other weapons on top to provide differing variety of enemies.

The whole world

My friend is making a webpage that handles a dashboard to some cyber security stuff and he asked me to make a globe.

Well technically he didn’t ask me he just suggested that we get a spinning globe on there. Instead of googling for a free solution like a reasonable person I thought “That sounds dope” and I rushed to make a globe in blender (cough cough https://globe.gl/). However the globe ended up being WAYY to good.

The “land” parts are pulled from a open source/royalty free topographical map from nasa https://visibleearth.nasa.gov/images/73934/topography

The data is then converted into a normal map and I make a blue -> brown -> green gradient on the maps which isn’t always accurate (which is why there’s no inland water, such as the great lakes.

I was debating on texture painting in the blue where it obviously should be but that was pushing it in terms of how long I wanted to spend on this. Majority of my time was spent integrating the globe into three.js , then wrapping that in a class which then got wrapped in a react component. However, I’m pretty happy with the results. Only other cool thing I could think of doing is adding some kind of wave effect near the shores but because the exported diffuse map is like 3 mb I didn’t want to add much more here.

If you zoom in enough some things are just missing, for instance. Delaware?

My plan there is to solve in post processing in the actual react widget to draw some state lines.

The end goal had lat/long lines, a alert system and a cursor to select said alerts. Pretty dope all in all.

(I also weirdly made the stars in the background in blender by threshold-ing some noise)

Okay kbar

I made a knife in blender and pulled it into unreal.. Haven’t rigged it up yet but the plan is to get a skeleton on it sometime tomorrow and throw it in the game. Maybe at some point I’ll start making the “game” but right now I’m just living off of this new .gltx high.

There’s probably some huge gotcha with the .gltx that I’m not seeing because this has been some of the easiest imports I ever did.

Even the sizing was easier. Man why did anyone ever make tutorials using .fbx?

I bought a broken bass

I bought a bass with rusty pickups without testing it. The guy I bought it from seemed like he knew it didn’t work so he threw me a t-shirt on the way out (probably as some moral compensation). Went home, plugged it in, no sound, bought pickups, swapped pickups, no sound, plugged in cable half-way, sound. I found out that this bass 1.) had bad pickups and 2.) had a improperly soldered line out. Already fixed the pickups and the line out was a polarity swap, so I fixed that just by swapping to a mono cable.

“Ol’ three string himself”

Next tale here is that abelton has a built in tuner so I jacked into my focusrite and went to tune up the provided strings.

I saw my E string was F so I naturally assumed that it was an octave lower (I had music playing so I wasn’t really “listening” to the strings). The second I turned it, snap, annnd I broke the E string. The rest of the strings ended up fine, I do have replacements but I was too anxious to get something recorded so I went hard with just ADG. (By hard I mean as hard as a 16 year-old who just picked up a bass).

Fun fact: this sounds like probably 3 /4 of the last things I made just done with a bass instead of a synth

Animation Nation

This morning I put some more effort into the glock. Added a 3 bone skeleton + 2 quick animations. My goal here was to rush into unreal to get a good feel for things. On that front also I’ve realized I have been making a mistake for the better part of 5ish years. I’ve been exporting as .fbx because I assumed that was an industry standard, but I soon realized from looking at a few blender forum posts: https://devtalk.blender.org/t/fbx-binary-file-format-specification/20814

The reason .fbx is so damn buggy is not because a general “asset pipelines are hard” it’s because the damn thing is a reverse engineered shit show. I always assumed there was no way to get blender materials and shaders into unreal but if you dump everything into a .gltf then EVERYTHING GETS IMPORTED.

The magic gltf button…

Only downside is that your scale factors dont transfer over and 1.0 unit is always going to be 1 inch. But honestly that’s soo much easier than memorizing the settings for unreal (scale: 0.01, units cm if you were wondering).

Praise blender gods they’re all there!

Now with that I setup the ol’ unreal animation pipeline. This always feels like a chore to me, I should really package up a template for this character pawn and the animation blueprint into a package at some point and maybe distribute it on the store. Maybe I can save a younger dev on going through the same crap that took me a few years to understand. To re-iterate the process

1.) Import all of your animations (INCLUDING AN IDLE OR T_POSE ANIMATION), ideally you would make the model + rig in one file and throw animations in the other. Then upon import click your pre-made skeleton from file A and then only import animations from file B (makes life so much easier).

2.) Make a new animation blueprint, open it, go to the “AnimGraph”. Right click on the grid, type “state machine”, click state machine, drag a line from state machine to the “Output Pose” block.

3.) Double click the state machine to start editing.

4.) Right click, hit “add state” name the state “Idle”

5.) Right click, “add state” name the state, “Fire”

6.) Drag lines from “Idle” to “Fire” and from “fire” to “Idle”

7.) Double click your “Idle” state to open it.

8.) Right click and type the name of your idle animation and the one that says “play animationName” click it. In my case my idle animation was called “glock_idle”

9.) Drag a line from your idle animation to the output pose so it looks something like this:

10.) Now repeat steps 7-9 with your fire animation (use the top bar to back out back to the state machine)

11.) Now add a new variable called “isFiring” to your animation blueprint (make it a boolean) and make sure it’s a public variable (make sure the eye to the right of isFiring is open)

12.) Double Click the symbol above the arrow that points from “idle” to “Fire” (I’ll call this the “Transition Symbol”

13.) Get isfiring and drag it to the “can enter Transition”

14.) Back out to the state machine and click the transition symbol for the arrow that goes from “fire” to “idle”

15.) Make this blueprint (“fire_001” is the name of my animation).

16.) Now go back to your “firing” state, click your firing animation and scroll down to “isLooping” , hit the bind drop down and select “isFiring”. (If your making a fire firing gun you wont see any difference in this step, but for a pistol it will clean up the transitions in and out of the “firing”state”)

17.) Now click “Compile” in the upper left, then at the lower right check “isFiring” and your weapon preview in the upper left should start playing the firing animation. (Make sure you have “edit selected instance” checked when you mess with this. “Edit Defaults” sets what value “isFiring” is when the blueprint starts, you want that to be false.)

(Ignore the sound and the sparks, besides the fact they suck we’ll get to there in a bit).

17.) (Optional Step) By default the blending mode when transitioning states tries to blend from idle to fire instead of just hard stopping. The default settings should be good for most people, but if your seeing your gun half shoots, then keeps shooting try this out.
Go back to your state machine: Single click the top transition symbol, in the “details” tab set duration to 0.0. This should prevent any gross slides from your idle pose to your fire pose.

18.) (From here on out I’m assuming you’re using the first person template) Now setup a shoot button in enhanced input if there isn’t one already. (See https://dev.epicgames.com/documentation/en-us/unreal-engine/enhanced-input-in-unreal-engine)

19.) In your character blueprint class add your weapon as a skeletal mesh to the camera. After adding setup the skeltal mesh to use your imported mesh, and set the animation settings to use your blueprint.

20.) Add this to your event graph.

  • Where “IA_Shoot” is the name of the enhanced input event that I made and added to the enhanced input objected use for this character
  • “Gun” is the name of the skeletal mesh that I added to my camera in my character
  • ” Glock_animBP” is the name of my animation blueprint class.
  • The print string block is for safety, if you see “BAD CAST” pop up on your screen you’ve messed something up.

21.) Go back in game and now when you shoot you’re animation will play:

22.) Now to add sounds+particle effects. Navigate to your fire animation in the content browser and double click it.

23.) There will be a playback line scrolling from left to right on the bottom, find the Time that you want to play a sound, right click on the horizontal bar that starts with “1”, right click > Add notify > play sound

24.) Now click the new sound notify and in the details tab in the upper right corner choose your sound:

25.) Back in the timeline section, next to the #1 on the left click the track dropdown and select “insert notify track”

26.) Now you should see a #1 and #2, next to the #2 right click where you want to see a muzzle flash and select “add notify” > Play Niagra particle effect. Now you should be setup to tie a muzzle flash to your animation. (Learn here: https://dev.epicgames.com/community/learning/tutorials/8B1P/unreal-engine-intro-to-niagara)

Only caveat there is that you’ll probably want to add a socket to your bone to attach the niagra system (learn that here: https://docs.unrealengine.com/4.27/en-US/WorkingWithContent/Types/SkeletalMeshes/Sockets/ ,,technically out of date but the same flow applies to unreal 5).

I really thought it would take me 10 minutes to list out what todo but it took me the better part of an hour.

Anyways as you can see the glock animations seem to be fine (I’m probably just going to do goldeneye style reloads) the sound and the muzzle flash kinda suck so that’s probably the next thing to do.

Yet Another loop

This one is more heady. I originally had more bass and general fuzz but I decided to tone things down once I found a nice voice “ahhh” sound in abelton. Nothing to crazy but I can see it falling into one of those rainy day vibes videos.

Still need to change that photo…
Auto-pan + a half sample is my friend

Pistol Pt 2.

I decided to forgo the attempts in substance for now and just make a minimal (lazy) textures that can be used in a game quickly if needed.

Geometry is pretty much the same minus the slots on the side and the newly added mag and slide release. Still kinda skinny if you ask me but good enough for majority of uses in my opinion. I’ll probably animate it and get it into unreal over the next week just to tell myself it’s “done” for now.

Still probably the best thing I ever made in blender in my opinion.

(Start of) A Pistol

I started grey boxing a glock type pistol to put in unreal. It went much smoother than I guessed it would. This was my first time trying to go from zero to 100 with using primarily reference images instead of just throwing things into blender to see what happens.

Now there’s a bunch of things missing, mostly in the controls side but I think I got a base to keep going and properly zone out each region to eventually add animations.

The biggest problems are: 1.) The back grip looks kinda bad and flat. 2.) There are no grip plates on the sides which I’m not a fan of. 3.) There’s no rail up front for mounting flashlights are whatever. 4.) the bottom and top slide don’t fully touch so there’s a small gap:

What’s straight missing is: Slide release, mag release, any text indicating what the gun is, and finally I didn’t make the mag this time around.

I think there’s also some more beveling I can do around the edges of the top slide to get things cleaner and smoother looking. But to be honest starting this surprised me, I didn’t think I had it in me to get a recognizable glock modeled, let alone getting UV’s reasonable enough to pull into substance. Definitely I’ll try to keep on this to get a base weapon into unreal.

How the hell do I open these doors

Answer: A bunch of number keys and a non-de-script knob

Now I see how damn clean that scroll wheel guard is and I hate it…

Past week I spent time making a keypad for the doors in one of my previous posts. This guy took some doing: specifically because 1.) I didn’t know that grids in blender existed and 2.) the coloring on the keys made me anxious every-time I tried to make something.

Here’s the greybox:

I had a bunch of iterations here but the three main things were having a keypad, a indication LED and a screen. My hope is to hook this baby up to the doors i made previously to have a quick key code minigame thing in unreal.

By far the hardest part was making not the keypad keys but the plate that would go in between the keys and surround them. One of the biggest things I always try to prevent when using blender is having any issues with normals. Usually it’s hard to come by them if you model in a proper manner (which can be summarized to: always make quad faces.). However, in this case I thought I could use a boolean modifier to make the plate which turned out pretty bad:

With the keys
Without the keys

You can see here the whole face is messed up however in blender things were looking fine. I don’t have an image for what it looked like but basically it was the keyholes with a subtraction modifier then beveled. Here’s quick demo of what I did:

Step 1. make a bunch of cubes, add an x and z array modifier to each then apply.
Step 2: add a difference modifier to the plate mesh
Step 3, select all of the forward face, the ctrl+b and bevel that

Now there’s some disconnect because if you pull this into substance (I didn’t do this with the demo) all hell breaks loose and your normals are thrown into a rock tumbler to get that keypad image above.

However I got past it by using the now holy grid:

Praise be to the grid baby

Which is a bit more painful for inital creation because you have to line it up with your keys but once you do it’s just a quick insert faces, then delete command.

Pretty much that, assume there are perfect squares infront of each face, then I deleted each key face ans solidified + beveled

But anyways It seems to look fine in game:

The knob doesn’t have the notches I want, but I can easily make the screen look like it’s on with emissives:

Pretty cool, now I gotta hook it up and import the new doors to start fleshing out this building.