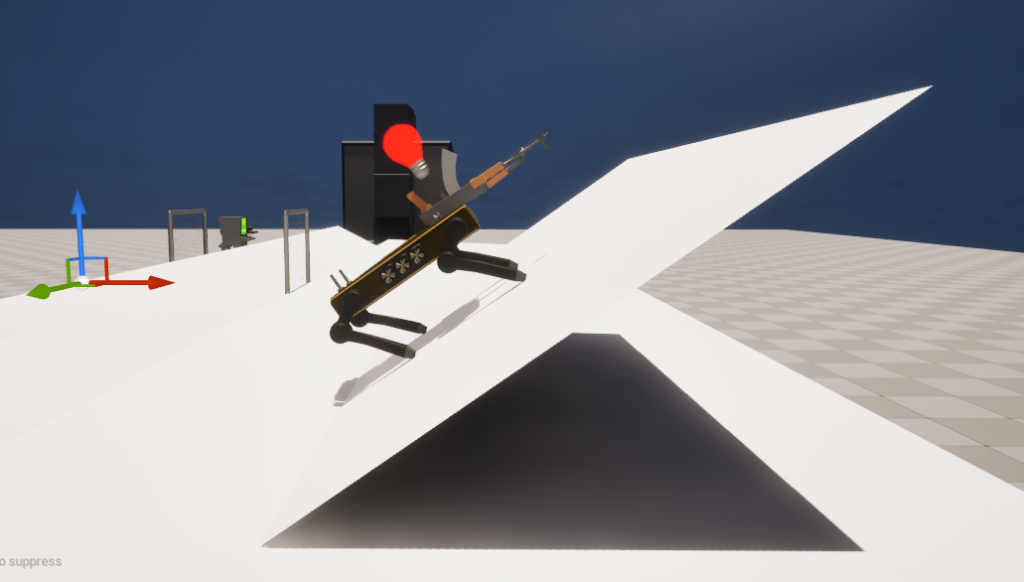
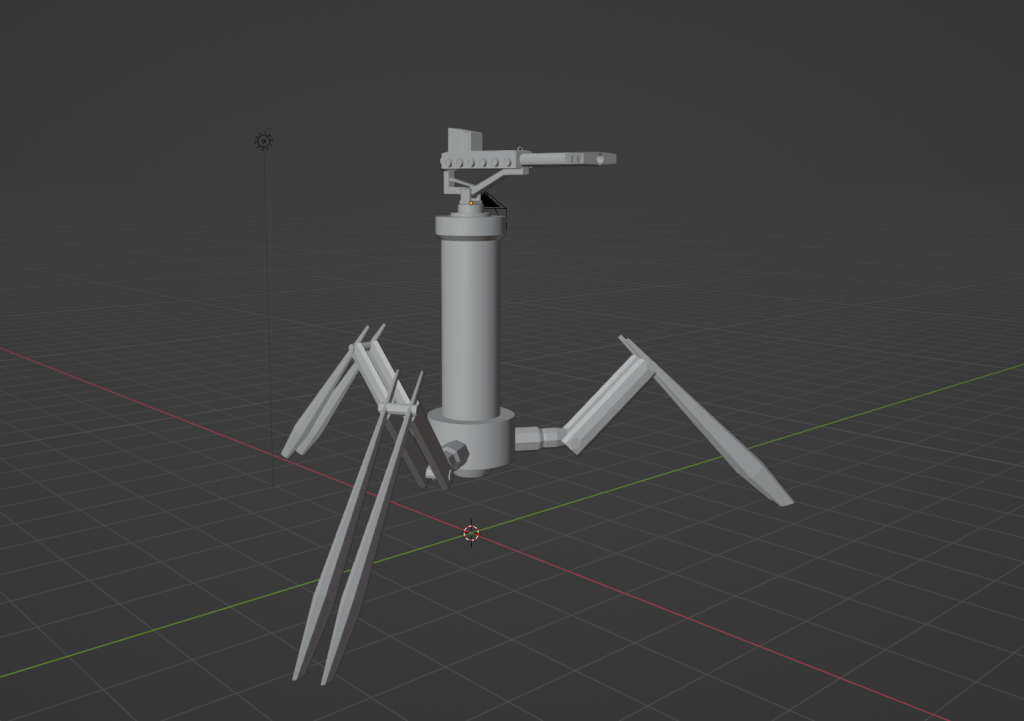
The red portion is steadily growing as the game goes on, then once I kill the death box you see it viciously drop to zero because it cleaned up all of the game time actors.
Looking at the timing data you can see that the large majority of the time is done handling the Lazer for the rocketeer, skeletal mesh of the patrol bot, the Tick function and the Hud.
I can immediately get 11.7ms back by just moving the Rocketeer_Laser from cpu to gpu:
With that small fix I went from 19 fps at max events to about 35 fps. However, I should be getting around 100 fps with my computer most of the time if the game (aka. I if I did) isn’t doing something dumb (which it probably is)
i7 3700k
ASUS prime z790-p
32 gig of DDR5 @ 2400 MHz
NVIDIA RTX 4090 24Gb of VRAM
The character models seem to be high on the list still, which I expected so I’ll need to remake these bots again. I feel like I should go about this differently this time and try to get some control rig action going, which I feel would be much more optimized and would hit my goal of getting hit reactions in. Also A low poly-ier feel might add to the experience? In addition moving stuff OUT of tick functions might be a smart move, I have things in there that really shouldn’t be and should be pushed to async events. Work for later this week.
Had a few learning experiences with Unreal when working on the global game mode settings stuff (Also I used the term “group ID” in the game but I call it “team ID” randomly so bare with me here and assume they’re the same thing).
1 – Event dispatchers kick off before the game tick (which I really should’ve known from the start).
Player presses transfer button, the transfer completes which triggers an event dispatch call from the terminal
The terminal alerts the assemblers connected that the team has changed
The assembler flips the team ID’s of the bots and alerts the game mode via another event dispatch call
The game mode (which is bound to all team ID change events) receives the event call and then alerts all of the assemblers the last location of the target
Then all of the assemblers get the direct call to alert their bots to a new target
The bots then get the alert for the new target
The problem started at step 3. The way I setup the patrol bots was that they would essentially copy their state from the actor into the control, then into the blackboard (see https://dev.epicgames.com/documentation/en-us/unreal-engine/behavior-tree-in-unreal-engine—quick-start-guide ) every tick (which is horrible and I need to fix. The controller should own the pawn and the pawn should be only relaying sensor-ish info back to the controller). In addition the way team swapping works on the patrol bot is that the bot will end it’s current engagement, then flip its internal team variable. Finally the patrol bot is alerted while its engaged it will NOT change its current target and will continue the engagement.
So the problem with that is that Steps 4-6 would execute before the next tick after step 3. Therefore the bot was alerted BEFORE it stopped its engagement and ignored the new target location. So from the game perspective the bot would stop what it’s doing then start walking to the last player location that was reported by the bots. The reason 4-6 executed is because it was a chain of event dispatches that lead to a function call. If I wasn’t using blueprints I probably would have gotten a segfault, however in this case what happened is that the tick was delayed until the event was finished.
This was fixed by changing how the controller worked so that when you get an event that stops the engagement you flip the value in the blackboard on the same chain that changed the team id. Therefore when the alert comes along the patrol bot is not engaged and the new target location is updated accordingly.
2-The there’s two functions to get a reachable point within a circle on the nav mesh and the one that works changes upon the context: – Random Reachable Point In Radius – When you’re in an actor – Random Location In navigable radius – When you’re calling from an AI task
I had the 2nd one swapped for the enemies so the only thing that would get a valid location was something directly on the nav mesh. I didn’t notice until I stopped putting stuff right where I wanted the bots to move to.
OTHER STUFF
Also I added a placeholder for the thing the player needs to destroy called
THE DEATH BOX
Which is just a box with health and a teamid.
This is the thing that gets targeted once the assembler gets its group id changed. There’s some other stuff I poked at, the AI had issues which I touched up. Difficulty gets set and propagated through the game mode down to the assemblers which sets the bot types and quantity.
Generally the bare bones “Game” part is working, I need to make a kill screen but basically we’re looking good. Here’s like 2ish minutes of gameplay (I had music playing from abelton while this was going but it wasn’t captured for some reason, abelton might have winsound trickery happening in the background…or obs isn’t as great as I thought) so its kinda quiet. But things to look out for: 1.) I start, the bots are shooting at me. I press the transfer button, the bots stop shooting at me and start walking towards the death box 2.) I press transfer on the second console and the transfer bar comes up and finishes, which causes nearby bots to stat shooting at the death box. 3.) The bots at the end just stop moving for some reason (Need to fix).
But in general I would say the main things left for this game mode are to integrate those lazy turrets I made a month or two back and ensure there’s a good death screen. Then from there the majority of the work will be aesthetic and polish (and a new gun or two).
I wanted to spend 30ish minutes making the alert light I talked about last post before work: here’s where I got:
At the end there the direction of the light is all wrong. Probably going to redo 100% of this later today (as it kinda looks bad anyways and a part of me wants the spinner in an animation).
It looks weird, I think its just the colors? And the proportions? And the shape?
In other news I did a bunch of backend work that isn’t pretty to look at: essentially I swapped out all of the old classes and re parented them to a generic “BlackLaceGameMode”:
This lets me make generic functions and I can pass some of the capability from the survival game mode into this new game mode (which I’m calling control).
Also performance seems to take a hit after around 20-30 bots in the world at once:
This isn’t the end of the world here (I can move a bunch of stuff into c++ and memory optimize it if I need to) but I think I shouldn’t be this bad with just a bunch of skeletal meshes. I bet if I started doing some occlusion culling (https://dev.epicgames.com/documentation/en-us/unreal-engine/visibility-and-occlusion-culling-in-unreal-engine) I would be able to get everything up to a very high fps. But I’ll punt performance optimization till after I get a game working. Next up is messing around with the terminal so it actually does something.
I think the sequence I’m thinking the player accomplishes to “hack” the system.
1.) The player clicks “transfer group id”
2.) There is then a password prompt that the player can guess or they can click “forgot password”
3.) Then a bunch of trivia pops up that the player needs to answer
4.) Then a new password is flashed across the screen
5.) The player enters the new password
6.) The player takes over the connected assemblers by pressing a button on the screen.
After #1 I think I want the turrets I made before to pop up out of the assembler and start shooting at the player, along with a bunch of red light spinners:
Another thing I’ve been diligent about is trying to make sure I don’t do anything dumb to preclude multiplayer in this game. I think getting multiplayer shipped is another animal but getting lan or local games working shouldn’t be too bad.
So like nothing is straight up crashing (which is good, also might not be too possible because I’m straight up wearing water wings by using blueprints), but you can see the bots aren’t persisted, the weapon selection isn’t persisted etc. I can poke around on getting that all working but again I think it will take away from the base “game” part of it. Definitely if I get it on steam then I think the first thing I’d try to attack is multiplayer. I’ve done that before in another game, you essentially gotta mark stuff as “replicated” or “non replicated” and if you mess it up you’re sending or recieving way to much data, oorr you’re giving control to someone who shouldn’t have it (such as giving a client the authority over where a player is located). You can also pull in achievements/scoreboards and server stuff but it required converting the game to full c++ then building in libraries that unreal cannot include normally (such as steamworks libs). So yeah, fun experiment but not doing that now.
I also added an “ai/ml” category for the site (it’s the lil brainy):
I decided to bite the bullet and startup learning pytorch(https://pytorch.org/) and basic neural net creation (Also this was a reason I dropped $2000ish on a 4090 a year ago and with the promise I could use it to do things like this). After the basic letter recognition tutorial (here) I decided I wanted to make a 1-d signal recognition tutorial.
Here’s the plan:
Make a simple signal
Make a simple neural network
Train an AI to detect the signal in noise
Test the neural net with data (Ideally in real time)
From this I can surmise I would need a few python scripts for generating test data, training the model, defining the model and some kind of simulator to test out the model. Ideally with a plot running in real time for a cool video.
Quick aside: If you see “Tensor” it isn’t a “Tensor (https://en.wikipedia.org/wiki/Tensor)” It seems more like a grammar replacement for a multi-dimensional matrix? To my knowledge there’s no size or value checks for linearity when you convert a numpy array to a tensor in pytorch so I’m guessing there’s no guarantee of linearity? (or maybe its because every element is a real constant I pass the checks every time?)
Make a simple signal
The signal I chose as my test signal was two Gaussian curves across 768 samples. Making this with numpy (which is much, much worse than matlab by the way, why isn’t there an rms function??? https://github.com/numpy/numpy/issues/15940 ). Essentially its 10ish lines of code
So making the network is obviously the most tricky part here. You can easily mess up if you don’t understand the I/O of the network. Also choosing the network complexity seems to currently be some kind of hidden magic that is wielded by PHDs. In my case I had the following working for me:
My Input vector size will ALWAYS be 768 (No need to detect/truncate any features)
My Output Vector will ALWAYS be a binary (either a yes or no whether or not the signal is present)
So this makes my life a bit easier in selection. The first layer of the neural network will be sized of 768, then a hidden layer of 128 then an output of 2. Why 128 a hidden layer of 128? I have no idea, this is where I’m lacking knowledge wise, my original though was that the “features” that I was looking for would fit into a 128 sample window but as I’ve progressed I realized that is a poor assumption to choose your hidden layer. My guess is that I’m doing too much (math/processing wise) but this assumption that I made upfront seems to have worked for me.
Train an AI to detect the signal in noise
So this is the bulk of the work here. The idea was to generate a bunch of signals that can be used to represent the span of real world signals a detector such as this would see. Therefore you have pretty much three parameters to mess with, signal delay (or number of samples to shift), signal SNR, and system noise floor. Technically you do not need system noise floor, I have it in there as a parameter anyways but I wanted to facilitate customization of any scripts I made for later. In my case I kept system noise floor constant at -30dB.
Essentially the pseudo code for generating signals is
1.) Take the ideal signal made above
2.) Apply a sample delay (positive or negative) to a limit so we don’t loose the two Gaussian peaks
3.) Apply noise at a random SNR within a bounded limit (in my case it was -10dB to 10dB)
4.) Threshold the signal to be a positive when the SNR I applied to the noise is above where I expect a detection.
The size of the training data, again I had no idea what I was doing here so I just guess 50000 signals to shove into the neural net? In reality this was a guess and check process to see if I under-trained/over-trained as I tested the model (I’m writing this after getting a working model which is uncommon for most of these posts). Also the training quality is also arbitrary here, I just kept running #’s until things worked: Kind of lame I admit but I have a 4090 and training takes 15 seconds so I have that luxury here.
Test the neural net with data (Ideally in real time)
To build out the simulator I wanted I basically took a bunch of the generation code from the training data and threw it into a common functions wrapper for re-use. My end artifact was to make a simple pyqt (https://wiki.python.org/moin/PyQt) app that had buttons for starting and starting a simulation and sliders for sample offset and for signal SNR. Then I would make an indicator if the neural net detected the signal or not. The only difficulty with this is mostly just dealing with async programming (which is a difficulty with all AI). My solution here was to have the main thread run the QT gui, then spawn a background thread to do AI work. The main thread would then generate the data and do a thread safe send (using pyqtsignal) to the background thread with the data after plotting. The background thread then processes the incoming data using the GPU and will send a positive or negative signal back to the main app to change the line color green for detected and red for not detected.
Results
(Top slider is sample offset, bottom slider is SNR)
The plot above is locked to 20 fps and all of the calls to the neural net on the gpu return well before the frame is finished drawing. Its pretty surprising this worked out as well as it did. However there are definitely issues with hard coupling of the signal being centered. I honestly still do NOT thing this is anywhere near what you would want for any critical systems (Black boxing a bunch of math in the middle seems like a bad idea). However for a quick analysis tools I can see this being useful if packaged in a manner that was for non-dsp knowledgeable engineers.
Other Notes Issues/Things I Skipped
I did many more iterations I didn’t write about here. I had issues with model sizing, training data types, implementing a dataset compatible with pytorch, wierd plotting artifacts etc.
Future work I want to do in this space:
Get better at understanding neural net sizing, I feel like I went arbitrary here which I’m not a fan of
Try to make the neural net more confident in where there is NO signal. The neural net dosen’t return a pure binary signal, it returns a probability of no signal or a probability of signal. When you see a red signal its really checking if the “Yes” probability is greater than the “no” probability AND if the “Yes” probability is greater than 60%. Ideally you would see values such as [0.001 0.99] when there is a signal present and [0.99 0.001] when there’s no signal. However, the “NO” signal probability seems to hover at 40-50% constantly and when there’s low SNR the probabilities are both around 50% which is pretty much useless here.
Comparison to matched filtering
My Neural Net
Full Convolution With Matched Filter
Multiplies
98560
589824
Additions
98430
589056
So on paper I guess this is “Technically” less work on the PC than a perfected matched filter response (i.e. auto-correlation). However, I think the problem here is that using a neural net to do something this simple is probably much more processing intensive than just making an filter that pulls out the content you want. But that being said if you had a high pressure situation and needed to do simple signal detection and just happened to have a free NPU in your system this could work.
I want to still get better at building these so I think my next step in will be more tuned towards analysis of several signals, then trying to combine them and bin them into each category (pretty much like the pytorch tutorial but more deliberate). Also get the code on github… Code is on github here: https://github.com/wfkolb/ml_signal_detector/tree/main