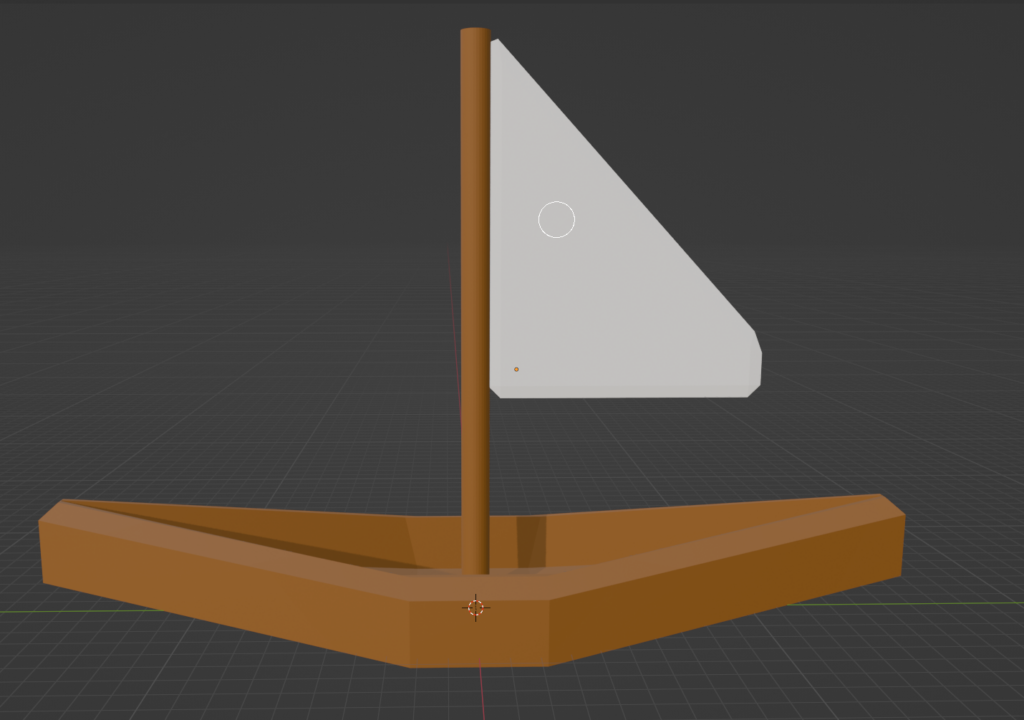
Brick by brick

Made a brick wall thats waaayyy to detailed to put in game:

I did this after frustration from trying to make a brick wall just from a texture:

Which looks much much worse. This was also my first major step into using geometry nodes in blender (see: https://docs.blender.org/manual/en/latest/modeling/geometry_nodes/index.html) which essentially let you make parameterized geometry in blender. You can see the layout for the geometry nodes:

Essentially my version is a modified version of the stack exchange post here: https://blender.stackexchange.com/questions/311786/how-do-i-create-bricks-in-an-object-with-geometry-nodes

Looks like a lot but really there’s only Two parts (2nd part is repeated 3 times):

This first part just takes whatever geometry I defined (in this case a cube) converts to type of “volume” then makes a bunch of individual points in said volume.

Theses points are then passed into the “second” portion which is essentially this flow repeated a 3 times:

This essentially says “Make a cube of size 0.25m 0.12m 0.065m, copy and paste the cube on each of the points, offset the position of all of the points chosen by my selection array by 0.06m, and set the material of all of the cubes to the brick material”. The incoming “selection” line to the “set Position” node comes from here:

“Index” is set for each cube on creation from “Instance On points” so If I make 200 cubes each cube will be labeled [0 1 2 3 4 5 …. 199]. What the “Floored Modulo” node does is take that index value and return 0 if the value is even or 1 if the value is odd, so that means the “set Position” will only be applied on even indexes, this gives the brick offset on every other row effect.

The bottom two portions here are for the mortar in between the bricks:

These are just smaller bricks that I apply a different material to then shove in between each of the bricks.

Now the problem with this is the number of triangles:

To give a frame of reference the first person view models should be “high poly” and the assault rifle for the game is around 4000 triangles.

So this would cause heavy performance issues if I actually put it in a game. There are solutions for things like this such as LODs (Level of details: https://en.wikipedia.org/wiki/Level_of_detail_(computer_graphics) ) and Unreal’s Nanite (https://dev.epicgames.com/documentation/en-us/unreal-engine/nanite-virtualized-geometry-in-unreal-engine) both would essentially dynamically change the number of triangles as you move through the world. However, I’m not trying to make the most photo-realistic things in the world so I think I might try to remake a wall with some normal maps (https://en.wikipedia.org/wiki/Normal_mapping ) instead.

Here’s a spin render of the brick wall:

Give me early 2000s nvidia vibes:

Rain Wilson

I added in rain and some mood lighting. There were also a bunch of other smaller changes but this is where I’m at.

It’s very dark and the rain kinda looks like pills falling so I’ll probably need to do another pass here. I’m happy with the water material I setup here:

Essentially its just a blue matte material with a sphere mask. The sphere mask just tells unreal what to make translucent instead of blue. Going back to my last game post (the one about how compiling materials is horrible). I made a generic rain material instance where I parameterized the rain settings:

Which it’s not crazy impressive but I used to modify the material directly so I’m happy with my personal progress here. I also started making a larger landscape for game and I think I have a better idea of how I want a real level to be shaped.

The rain itself is attached to the character. Which I honestly kinda hate, I could add another ray trace to check if the player is inside, but I’m trying to limit the amount of work I do in the tick functions.

I also moved the whole project up to unreal 5.6 from 5.3

This has a better setup for first person games where it renders the gun ontop of everything else so I don’t need to do as many weird tricks to make the gun not clip through walls.

Example:

Finally I added a zoom with right click:

I’m leaning towards making larger maps so I wanted to add in things to facilitate that. Currently my focus is on making said “Larger Map” which I think might take the majority of my time from the game here. The only thing that might be required to make a map like that work is a vehicle system, which I think shouldn’t be horrible to make as unreal has a bunch of templates for that. The map itself however I can see easily making the game zero fun, so my primary goal is to really just start pumping out levels to see what works.

How (Not) to use materials in unreal

hell yeah

The borderlands 4 issues with unreal (see: https://www.pcgamer.com/games/fps/borderlands-4s-latest-patch-triggers-a-flurry-of-performance-complaints-but-gearbox-says-new-stuttering-problems-should-resolve-over-time-as-the-shaders-continue-to-compile/ ) made me realize I was doing all of my materials wrong.

Originally the way I pulled in 3d meshes generated a material of each slot in the mesh. So I thougth I was being clever by using material slots to determine colors (so I didn’t have to texture paint), however the issue above made me actual look into things. So I was taking materials for granted as things that were inherent to unreal, however materials themselves are nothing more than giant HLSL files (see https://en.wikipedia.org/wiki/High-Level_Shader_Language). This means that every material I made has to be complied for whatever graphics hardware the user is using (which is the borderlands 4 problem from the article above.) The solution is to use material instances (see https://dev.epicgames.com/documentation/en-us/unreal-engine/creating-and-using-material-instances-in-unreal-engine)! These are parameterized unreal materials which allow for the developer to expose parameters into compiled base materials so we dont have to deal with as much shader compiling.

Sooo from just imports and optimized development had 30-40 plus materials which would come from asset imports, most I could categorize into:

-Painted Metal
-Exposed Metal
-Wood
-Plastic
-Rubber
-Concrete
-Brick
-Glass

So instead of 30-40 compilations for all of the materials I could whiddle things down to 8 compilations to save myself from making the user wait with no colors on their screen. After 30 painstaking minutes I was able to remove all other materials (minus a few specialized ones) to the 8 materials above and instances thereof.


Now things look a little shinier and more visually consistent

The side effect that I wasn’t expecting is that the game is now BLAZING FAST. I went from around 60-70 fps on light load and 40-50 on heavy load on average to pretty much locking to 120fps in light load and 80fps in high load. I had plans to re-write how I handle some of the animation data transferring but I’m thinking now that might not be needed.

I also did some work on the ai so they stayed a bit more mobile. I also added recoil to the bots

Also bots now have a pitch when aiming:

Finally I added in weapon switching via the num keys:

I want to add a half-life style cross selection bar but that will probably happen later with another hud pass.

The gameplay test map has now gone from a placeholder dev map to a low effort source engine map:

The whole level I would argue is pretty bad for gameplay also the only thing I want to add is some rain effects just to get a vibe then I’ll move onto a kind of multi-lane style of map.

Touch-ups (also feat. boomstick)

Got the double barreled shotgun in game:

I also added in some tracers to make shooting a bit better:

On the back-end side I re-worked how damage functions, so now there’s falloff for shots: (Note the damage numbers in the corner).

This should make things a bit better in terms of longer range engagements.

I also added more limits to the bot’s ragdoll so the legs won’t just stick around when you shoot them.

Also Send to UE is broken in blender 4.5.2

https://github.com/poly-hammer/BlenderTools/issues/168

Also I’m starting to take that gameplay map and expand it out a bit

Finally I made a fence tool:

So progress all over the place.

“Time is the Enemy” (feat. boombstick)

Now that I’ve closed the gameplay loop I realized there’s really nothing pushing the player along. Right now if I just have “go destroy this thing” the gameplay would get stale very fast. To counter this I wanted to make some kinda timer that would force the player to go out and explore/accomplish their mission. I was thinking about adding something more akin to a base that would get destroyed if you did nothing but that would GREATLY increase the amount of work here (This human npcs, animations, sounds etc.). So I started making this guy instead:

The idea is that the robots are trying to destroy the world or something and they have these devices that are slowly going to rise up then come slamming down. The player will be tasked with destroying these devices before the end of the world!

This also give me the opprotunity to break down the game into phases (like “the first slam” the “second slam”, “The final slam”) to have the map change, difficulty ramp up etc.

Or maybe I’ll have a huge lazer come out the bottom of that middle thing?. In other news:

I resurrected a double barreled shotgun I had half finished earlier and I need to get it in game. This is very rudimentary and basically doesn’t make sense design wise. For instance:

That bottom bit is all one piece, so there’s really now way to open the breach. However currently all of my reload animations are just “hide gun” “wait a second” “Show gun” so for now I think I’m good.

Also I was thinking about adding a ps1 art style in this so I started messing with texture warping (which I honestly read zero about before hand so this isn’t great).

Seems like a good way to give people motion sickness…

Bunch-o-Updates (also “Git outta here”)

Here is the first full(ish) gameplay demo for this game mode (gotta use youtube because of WordPress size limits)

Big things that changed:
I added a bit more to the test gameplay map:

Including a quick fence model:

Also I put lights ontop of all the bots to indicate what team they’re on. Blue=player team, red = enemy team.

I also added hit reactions (animations for when the robot gets shot) to the bots to make things less…robotic:

I also added that red flash. I wanted to do for a while now to get a bit more zelda-y vibes. I also fixed up some problems with the shooting mechanics. Turns out I was making a ray from the center of the screen to the place where the tip of the gun was pointing rather than making a ray from the center of the screen forward, then making a ray from the tip of the gun to that location.

There was also some work done on how bots engage/disengage. I need to do more work there, everything right now is copied in the tick function which is bad. Also the pawn controls everything which is also bad (Controllers are more easily replicated for multiplayer).

Also unreal’s detection of source control stopped working so I gotta do everything manually in git bash. Not the end of the world but still, kinda weird. EX:

I broke something but I’ll punt on this for now. Finally I think I’m going to remove any bot types outside of the gun bot. They’re really unbalanced right now and kinda buggy, I’m thinking I’ll try to diversify the bots based upon different attack types (gun, motor, close range, AOE). I also included unreals crowd avoidance systems (see https://dev.epicgames.com/documentation/en-us/unreal-engine/using-avoidance-with-the-navigation-system-in-unreal-engine) , which all…kinda work?

More polish to do in general though I want to make that test map a city style map to try honing in on what I want the game to look like.

Side Profile(r)

I closed the “Game Loop” by adding announcements to the hud and creating a “OnGameModeAnnouncement” event that huds can bind to:

The look isn’t ideal but I’m working through it.

In addition when I flipped things to “Standard” game mode (which has pretty much all of the bot types) my fps went from like 60 to 20 very fast. On my machine thats pretty bad. I went through the profiler (https://dev.epicgames.com/documentation/en-us/unreal-engine/unreal-insights-in-unreal-engine) and got these results

The top is the important part (lower is better)

The red portion is steadily growing as the game goes on, then once I kill the death box you see it viciously drop to zero because it cleaned up all of the game time actors.

Looking at the timing data you can see that the large majority of the time is done handling the Lazer for the rocketeer, skeletal mesh of the patrol bot, the Tick function and the Hud.

I can immediately get 11.7ms back by just moving the Rocketeer_Laser from cpu to gpu:

With that small fix I went from 19 fps at max events to about 35 fps. However, I should be getting around 100 fps with my computer most of the time if the game (aka. I if I did) isn’t doing something dumb (which it probably is)

  • i7 3700k
  • ASUS prime z790-p
  • 32 gig of DDR5 @ 2400 MHz
  • NVIDIA RTX 4090 24Gb of VRAM

The character models seem to be high on the list still, which I expected so I’ll need to remake these bots again. I feel like I should go about this differently this time and try to get some control rig action going, which I feel would be much more optimized and would hit my goal of getting hit reactions in. Also A low poly-ier feel might add to the experience? In addition moving stuff OUT of tick functions might be a smart move, I have things in there that really shouldn’t be and should be pushed to async events. Work for later this week.

Events are interrupts but in a make believe comp-sci context

Had a few learning experiences with Unreal when working on the global game mode settings stuff (Also I used the term “group ID” in the game but I call it “team ID” randomly so bare with me here and assume they’re the same thing).

1 – Event dispatchers kick off before the game tick (which I really should’ve known from the start).

If you’re interested in what I mean by event dispatchers see (https://dev.epicgames.com/documentation/en-us/unreal-engine/event-dispatchers-in-unreal-engine)
The way I have the transfer from the terminal originally setup was:

  1. Player presses transfer button, the transfer completes which triggers an event dispatch call from the terminal

  2. The terminal alerts the assemblers connected that the team has changed
  3. The assembler flips the team ID’s of the bots and alerts the game mode via another event dispatch call
  4. The game mode (which is bound to all team ID change events) receives the event call and then alerts all of the assemblers the last location of the target
  5. Then all of the assemblers get the direct call to alert their bots to a new target
  6. The bots then get the alert for the new target

The problem started at step 3. The way I setup the patrol bots was that they would essentially copy their state from the actor into the control, then into the blackboard (see https://dev.epicgames.com/documentation/en-us/unreal-engine/behavior-tree-in-unreal-engine—quick-start-guide ) every tick (which is horrible and I need to fix. The controller should own the pawn and the pawn should be only relaying sensor-ish info back to the controller). In addition the way team swapping works on the patrol bot is that the bot will end it’s current engagement, then flip its internal team variable. Finally the patrol bot is alerted while its engaged it will NOT change its current target and will continue the engagement.

So the problem with that is that Steps 4-6 would execute before the next tick after step 3. Therefore the bot was alerted BEFORE it stopped its engagement and ignored the new target location. So from the game perspective the bot would stop what it’s doing then start walking to the last player location that was reported by the bots. The reason 4-6 executed is because it was a chain of event dispatches that lead to a function call. If I wasn’t using blueprints I probably would have gotten a segfault, however in this case what happened is that the tick was delayed until the event was finished.

This was fixed by changing how the controller worked so that when you get an event that stops the engagement you flip the value in the blackboard on the same chain that changed the team id. Therefore when the alert comes along the patrol bot is not engaged and the new target location is updated accordingly.


2-The there’s two functions to get a reachable point within a circle on the nav mesh and the one that works changes upon the context:
– Random Reachable Point In Radius – When you’re in an actor
– Random Location In navigable radius – When you’re calling from an AI task

I had the 2nd one swapped for the enemies so the only thing that would get a valid location was something directly on the nav mesh. I didn’t notice until I stopped putting stuff right where I wanted the bots to move to.

OTHER STUFF

Also I added a placeholder for the thing the player needs to destroy called

THE DEATH BOX


Which is just a box with health and a teamid.

This is the thing that gets targeted once the assembler gets its group id changed. There’s some other stuff I poked at, the AI had issues which I touched up. Difficulty gets set and propagated through the game mode down to the assemblers which sets the bot types and quantity.

Generally the bare bones “Game” part is working, I need to make a kill screen but basically we’re looking good. Here’s like 2ish minutes of gameplay (I had music playing from abelton while this was going but it wasn’t captured for some reason, abelton might have winsound trickery happening in the background…or obs isn’t as great as I thought) so its kinda quiet. But things to look out for:
1.) I start, the bots are shooting at me. I press the transfer button, the bots stop shooting at me and start walking towards the death box
2.) I press transfer on the second console and the transfer bar comes up and finishes, which causes nearby bots to stat shooting at the death box.
3.) The bots at the end just stop moving for some reason (Need to fix).

I was also looking at this: https://trello.com/b/dmIooAod/blacklaceworking-board and most of these are gonna be deleted. The woes of working with non-concrete plans..

But in general I would say the main things left for this game mode are to integrate those lazy turrets I made a month or two back and ensure there’s a good death screen. Then from there the majority of the work will be aesthetic and polish (and a new gun or two).


Failing to make a Alert Light

I wanted to spend 30ish minutes making the alert light I talked about last post before work: here’s where I got:

At the end there the direction of the light is all wrong. Probably going to redo 100% of this later today (as it kinda looks bad anyways and a part of me wants the spinner in an animation).

It looks weird, I think its just the colors? And the proportions? And the shape?