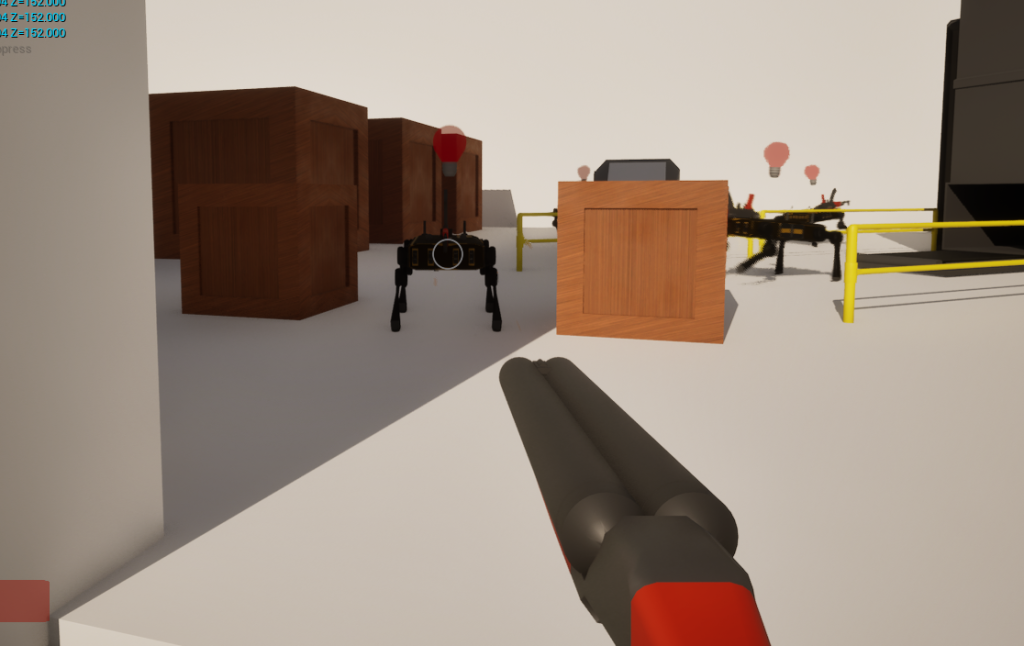
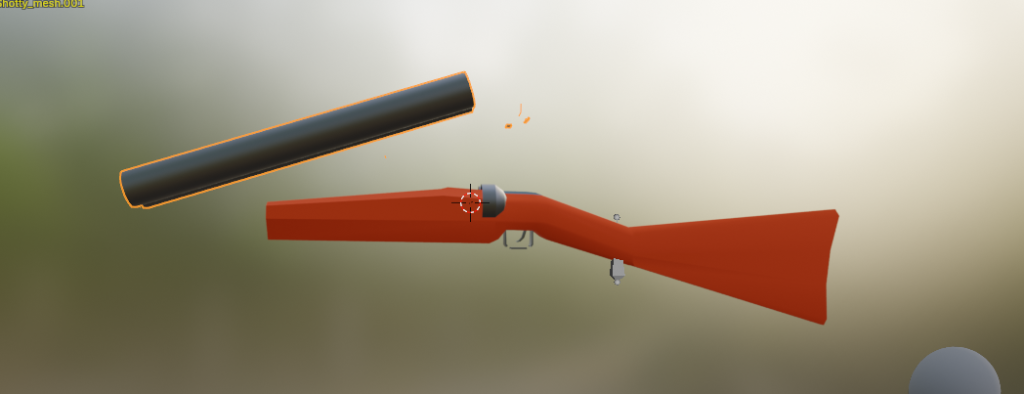
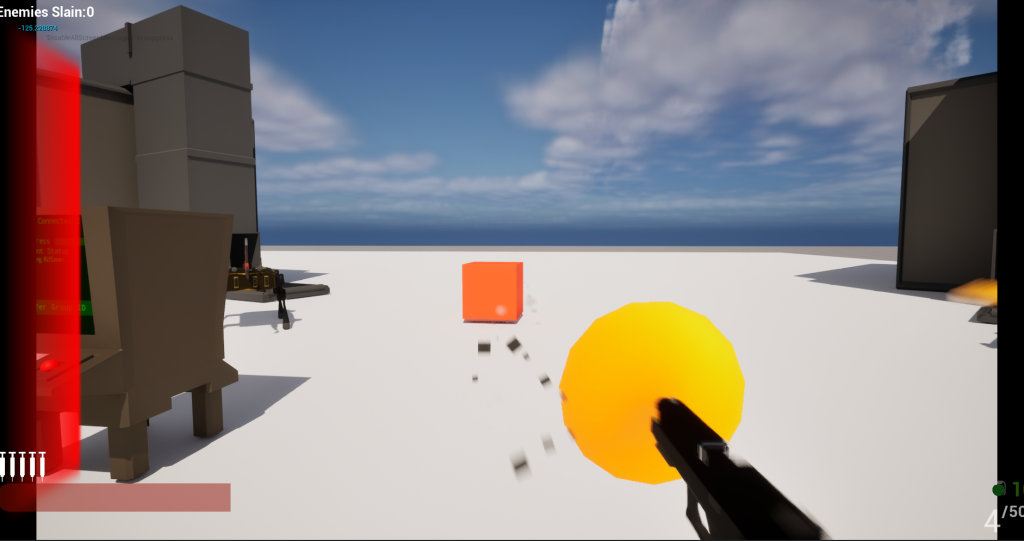
Stab-y Boy

Added in a small fast stabbing bot that will charge at your feet. I think there’s some collision issues that I gotta get through (you can see me getting pushed back during the gameplay above). But I think I got the hook ups nice enough that it’s not really a huge issue.

Animation is now REALLLY easy for the bots, I can pump out a quick couple keyframes in 20 minutes rather than the 2-3 hours it took before with blender.

I also updated the class structure to be an actual class structure and I can re-use code.

In addition I added some camera shaking when stuff explodes

I think there’s still a question of the directionality of the shake but right now it helps portray an explosion when off next to you. To a lesser extent I have it when you get shot but nothing crazy yet.

Some Gameplay

…I’m gonna quit on the physical hit reactions thing and just make a blendspace. There’s a hackyness to the ue5 physical animations which I seem to be stuck on and I do not want to spend much more time on it.

I’m still happy I ported all of the animations to UE5, that pipeline is much faster and cleaner than adding animations from blender. Now I can start iterating on newer enemy behaviors a bit faster.

New enemy types

After going through the physical animation gambit I added in a new enemy type. A Grenadier, right now they throw frags and flashbangs but I’ve added them into the basic survival gamemode as random spawns. The game feels a bit more like a game but the levels are so not fleshed out that it feels very vacant.

Also the bots are clipping with each other hardcore, not sure whats up there..

Here’s a few minutes of un-edited game-play (Crap quality because I haven’t messed with the wordpress upload limits yet.)

Its all still very rough, and there still no sounds for the frags hitting or detonating so you’ll just randomly die without a reason. Also I’ve hit one or two bugs that make you fly really fast across the map sooo I’ll try fixing that.

In other news I found out the way I was doing bullet hit effects was wrong so I fixed that (world context thing) now you get better hit interactions. My next goal is to clutter up the map above and fix the clipping to try to get everything feeling a bit more alive.

Behold…IK

Took the bot body and made IK in unreal.

Turns out the big tower of blueprint blocks I was talking about is 100% what you’re supposed to do (meaning I see it replicated in every tutorial I see).

BEHOLD

Right after making the last picture I deleted 100% of my work for the last 3 hours…

So I recreated everything and realized I can do WAAAY less to get the same result. So the result of the redo:

Yeah… the I still have to figure out why it splits like that. My guess is that I shouldn’t have separated the bones in blender and I should re-import and see how it goes. But the IK works fine

A bit smaller blueprint graph also:

Also the IK block I used is now smart enough to handle ground better than I was doing in the first picture.

Essentially what it does is:

1.) Draw a line from the end of the leg bone to the control

2.) If there is a hit perform IK to the hit point otherwise perform IK to the control.

Surprisingly simple….

Then the final touch:

UE Control rigs and Custom Numpad setup

I kept looking at the last video I posted and got really annoyed at how bad the animations of the patrol bot looked. This drove me to remake the animation rig for the patrol bot (to be much, much simpler) and I started making a control rig in unreal to push the animations there (see https://dev.epicgames.com/documentation/en-us/unreal-engine/how-to-create-control-rigs-in-unreal-engine).

Now why use Control rigs? Honestly not too sure yet… My hope is that IK is easier (so I dont have to add IK bones) but adding these controls seems tedious, in addition your forward solve block I guess has to be a big tower of blueprint power?

I’m probably missing the plot here, but also my “forward solve” seems to be undoing my “backwards solve” where I assumed “backwards solve” was used for IK situations. I’m still playing around but the hope is that by using unreal internals I should be able to handle the physicality of the bots a bit better than I expect.

Also I had an gmmk numpad (https://www.gloriousgaming.com/products/gmmk-numpad-keyboard?srsltid=AfmBOoqt9KEojE6tva-cmlDcTDtw1XiBNFEktoFWoobeNvWKYGD8ZtL0 I got it on sale for $90 but I think its still crazy overpriced) which I wanted to use for ableton and never got working (the slider plus the knob weren’t configurable to midi in). So I installed a via flavor of QMK ( https://caniusevia.com/ ) which lets me configure my keyboard in browser.

Which would be amazing if: 1.) Firefox supported usbhid and 2.) If I could remap the slider. But right now its really good for me using OBS to record rather than the snipping tool which records at like 20fps.

So for example here’s the control rig I described in action, BUT there’s no OBS window visible!

Otherwise I think I’m still dead-set on remaking the patrol bot animations in unreal. Walking and reload might be the most annoying but mostly I want to be able to make quick animations without the huge headache of .fbx exporting and importing (even with the blender unreal addons https://www.unrealengine.com/en-US/blog/download-our-new-blender-addons , which work amazing for static meshes, kinda sketchy for skeletal). I kinda wish unreal had the option of slicing the animation list of an FBX and attempting bone resolution before importing. I really want to get this working because then my workflow stays in unreal for animating. Blender is still blows unreal out of the water for making meshes IMO but animations in Blender still seem hacky with the action editor.

There are a few things I’m actively annoyed with when it comes to control rigs (which I wont show you here because I’m still WIP with this one.) I’m also a straight up control rig novice so I bet as I learn these problems might be solved with better practices.

1.) You cant manipulate the control shapes in the editor preview window. Seems like that would be an easy addition and should match the same kind of workflow as the “hold control to bump physics asset” thing.

2.) Control rigs are effected by bones. This one I get WHY but it seems counter-intuitive that you would ever want to make a rig that is controlled by a parent bone. I get the idea of attaching to a bone in order to have like a small sub object (for example a turret on a large ship).

3.) When you add a control to a bone it adds it to the children of that Bone. This would be fine if #2 wasn’t a thing.

4.) Adding Default forward solve assignments are not automated. I bet I could find a python script to do this but still, that blueprint tower of power really can and should be made upon generating a new control for a bone.

Still gonna push ahead with the control rigs though…Modular rigs freak me out (https://dev.epicgames.com/community/learning/tutorials/Dd31/unreal-engine-modular-control-rig-rigging-with-modules) and seem to be used primarily for bipedal skeletons.

Unreal Stuffs

I’ve been playing too much xcom and I felt like my c++ skills were waning so I thought it would be a fun quick project to quickly spin up a turn based squad commander system.

There’s probably a way to make these go away…

The camera

First thing that is distinctive about xcom is that it’s an isometric game, therefore the camera is fixed above the level and travels along various levels of the map. To achieve this effect I made a quick camera pawn that does two things: Ray traces to a fixed height above the ground and constantly aligns itself to a specific pre-set orientation.

Instead of going crazy with pre-mades I just threw a camera component onto a pawn class with a few pre-set parameters.

Header code:

  //CLASS BLUEPRINT EXPOSED PROPERTIES
	UPROPERTY(EditAnywhere, BlueprintReadWrite, Category = "2D Camera Settings")
		float BaseHeightOffGround;

	UPROPERTY(EditAnywhere, BlueprintReadWrite, Category = "2D Camera Settings")
		float CameraAlignmentRate;

	UPROPERTY(EditAnywhere, BlueprintReadWrite, Category = "2D Camera Settings")
		float HeightCorrectionRate;

	UPROPERTY(EditAnywhere, BlueprintReadWrite, Category = "2D Camera Settings")
		FRotator BaseCameraRotation;
	//END CLASS EXPOSED PROPERTIES

	//START COMPONENTS
	UPROPERTY(VisibleAnywhere, BlueprintReadOnly, Category = "PrimaryCamera", meta = (AllowPrivateAccess = "true"))
		UCameraComponent* PlayerCamera;

	UPROPERTY(VisibleAnywhere, BlueprintReadOnly, Category = "Collision", meta = (AllowPrivateAccess = "true"))
    	UCapsuleComponent* CameraCollider;

The tick function I have two lerps: 1.) for the current camera orientation and 2.) for the result of a down racytrace + a fixed offset.

//Ensure we're rotated properly to the desired world rotator that the user specified
    FRotator currentRot = GetActorRotation();
    FQuat newRotation =  FQuat::Slerp(currentRot.Quaternion(), BaseCameraRotation.Quaternion(), CameraAlignmentRate*DeltaTime);
    SetActorRotation(newRotation);
    // Get the world object
    UWorld* World = GetWorld(); 
    // Check if the world exists
    if (World)
    {
        FVector Start = GetActorLocation();
        FVector End = Start + FVector::DownVector * BaseHeightOffGround*10.0f;
        FHitResult Hit;
        FCollisionQueryParams QueryParams;
        QueryParams.AddIgnoredActor(this); 
        bool bHit = World->LineTraceSingleByChannel(
            Hit,                
            Start,             
            End,              
            ECC_Visibility,     
            QueryParams         
        );
        if (bHit)
        {
            FVector newWorldPos = FMath::Lerp(Start, Hit.Location + FVector(0,0,BaseHeightOffGround), HeightCorrectionRate*DeltaTime); 
            DrawDebugLine(
                GetWorld(),
                Start,
                Hit.Location,
                FColor(255, 0, 0),
                false, -1, 0,
                12.333
            );
            SetActorLocation(newWorldPos);
        }
    }

THE RESULTS!

Note: the red line is just for my debugging purposes. Also the camera will not be visible in game.

The DSP engineer in me is balking at the casual use of a delta time and a linear interpolation. But, we’re on a PC running at low data rates (60hz!?!? pfffffff I could get this running at 24khz) and variable frame sizes so while I keep thinking “I could optimize this to be less MIPS” I think I’ll just press on…

Commanding/ Game structure

In xcom the turns are play out that you select a squad member, choose their action, move to the next squad member, choose their action, until you have no more squad members, then your turn is over.

Now there’s a few ways I could implement the squad mechanics. Specifically the way that each squad member gets controlled and how the player controller interacts with them. I could have the user’s controller re-posses each pawn upon selecting them (which might save memory but increase the work upon possession). However, I would still need to perform path finding to move the character to a specific location. Instead I think the way I want to play it is to have every squad member owned by an AI controller that receives broadcasts from the player controlled camera pawn. Below is my rough diagram (I think there’s a gamemode state in there that I need to throw in but generally I think this is fine)

www.drawio.com FYI

In addition to handling the general flow of the game I think the other side is that this sets the game up for multiplayer from the start.

The command/game state messages I think I’ll probably make delegates in the game mode that the controllers can subscribe to. Then the deaths of squad members and selections I think I’ll push to to the controllers? My thought here is:

I’ll probably jump back on this tomorrow and start coding up the events and perform in a test or two.

Leaning Updates

(Writing as I’m doing this fyi) I wanted to re-write the leaning in the game. Right now the movement is all very snap, which has some skewing to it but i wanted a more gradual lean in.

Event graph level

(Normally I would use https://blueprintue.com, but wordpress is weird about iframes)

Now you can see here the process is, press button, move to desired input. My first thought was to throw in the delta seconds of the last frame, add a rotator and vector interpolation block and be done with it, however, Unreal’s input system is actually made for this. If you look at the top blueprint I have a few branch statements that was thresholding based upon the input value. Instead I’ll use that input value to skew between the lean position and the rest position.

My lean action by default is a 1-d float which is cumulative, which should mean that as I press the lean keys (Q+E) the value of the lean action (the Axis value line from the first plot) should increase as the buttons are held down.

Therefore, if I just use that value to skew between the lean position and rest position I should be good….

I was not good

What I described above is TOTALLY not how this works. Advanced input seems to not hold any kind of state from the previous frame unless you’re using defined curves. For example there is a “scale by delta time” modifier that works but it takes whatever the current input is and multiplies it by the frame time. This can be useful but my goal here was to avoid adding another accumulator within the player blueprint class. You can add an exponential curve but that’s just a modifier to the input values. I don’t think there will be a good way here other than adding a “currentInputValue” modifier and having it decay at a fixed rate…

This is one of those situations where I shot myself in the foot for using blueprints, however I think there’s enough syntax and other bugs that I saved myself from that I don’t care that much. For example In matlab (which I use a bunch at work) this problem can be solved via:

startPos = [-10 -20 -40];
endPos = [-10 20 40];
restPos = [-10 0 60];
inputAxis = linspace(-1.0,1.0,3);
[iAx iAy iAz] = meshgrid(inputAxis,inputAxis,inputAxis);
[xOut yOut zOut] = interp3([startPos;restPos;endPos],CURRENT_INPUT_VALUE,iAx,iAy,iAz);

I think unreal can do this with curves but my head moves towards code when we get to 2+ dimensions. But honestly this is me overthinking on coffee at this point, I’ll just throw it in with another accumulator and some alpha smoothing (https://en.wikipedia.org/wiki/Exponential_smoothing, which I believe is implemented in https://dev.epicgames.com/documentation/en-us/unreal-engine/BlueprintAPI/Math/Smoothing/WeightedMovingAverageFloat)

Attempt #1

First thing I is that I embraced curves:

Which was so simple I’m confused why I didn’t start with these. The only hitch I had is that it was annoying to find the “getVectorValueFromCurve” block. If you just blindly add a curve class or runtime curve class this isn’t exposed. Now the results:

This worked but now I’m hitting issues with state management. The rough way the Unreal input system works is:

if(currentState == buttonPressed && previousState == buttonReleased)
{
   Trigger(inputValue);
}
elseif(currentState == ButtonReleased && previousState == ButtonPressed)
{
   Ongoing(inputValue);
}
elseif(currentState == ButtonReleased && previousState == ButtonPressed)
{
    Complete(inputValue);
}else
{
    //DoNothing
}

Which essentially means that putting the logic attached to button presses is a fools errand. I need to move it out to the tick function, or I need to figure out how to modify the states above to keep firing the “completed” state.

Attempt #2

I tried messing with advanced input and hit the same state issue. I was hoping I could set the trigger to also be released but it never hits more than once.

No dice…gotta push the input value smoothing and the lean function to the delta. This will require another variable to handle the previous input value of the lean buttons. This might mess up the way I visualize the math but lets see what happens.

Attempt #3

This seems to be the best lean method. Essentially I needed to add one more var to handle the current value of the input and keep the same one that defined the previous variable. Below is the blueprints.

Tick event is the input to the left

Pretty simple at the end of the day. Hard part about this stuff is never what you’re doing its always that transition from what you’re doing into the mental model that the unreal devs used.

Finally my management failure…

Which doesn’t really matter too much because I’m working solo, without a server to push content to. However its just bad practice to not protect yourself from silly confusing mistakes (which will increase as you get to the end of development).

Next goals

1.) Add a flashbang and grenade robot (look back in my notes I have a flashbang and m67 already modeled).

2.) Add a new weapon

3.) Add a humanoid character that rides the robots?

Chaos Physics 1…me 0

Spent a bunch (like 1-2ish hours) of time trying to get the chaos physics working with the tree and…

It kinda works but the issue comes into the in game interaction. The damage levels seem to be weirdly arbitrary and aren’t assigned to a root bone but the pieces themselves Also the definition of “damage” seems to be just a number that gets exceeded in a fixed amount of time. I could probably figure this out with another day or so of digging but I’m starting to get fixated on this rather than just straight up making the game. However, I’m going to go through my experience just to give an intro/document for myself in the future.

Making a destructible object

This part actually wasn’t that hard, essentially you just drag/drop a mesh in. Flip to the “fracture” mode and click new. Then you start using the slicing tools on the left hand side to cut apart the mesh, then you select sub-part of the mesh and cut again.

This creates a tree of destructible on the left hand side where each “level” is a root piece that has child pieces.

So the idea seems to be you break the root the rest will break off. However, that’s the part I’ve been stuck on, there’s damage settings that seem to not work the way I would expect. Either way I’m moving the goal to making more weapons and enemies.

Tree part 3

Recording myself modeling another tree. Then I realized I probably shouldn’t be posting videos with copyrighted music, so I made a song to go along with the tree recording (I used some of the pre-canned abelton clips for bass and vocals which feels like cheating but I wanted something kinda alright and fast, the drums I did myself.)

There’s one branch that looks weird to me but otherwise I think it came out alright.

This also was my first time using KdenLive (https://kdenlive.org/en/) which is surprisingly good for an open source video editor. Last time I was editing video heavily was probably in high school with a trial copy of sony vegas and windows movie maker.

Highly recommend if you want basic timelines + audio editing, if you’re going crazy with effects might be better to stick to adobe’s software.

Now I can go probably make small variations to the same tree 3-4 more times to get a good low-poly forest going.

More Tree For Thee

I made a better tree, not perfect (it still has the weird branch in the upper left) but its more passable than the other tree I made.

I also found in unreal the “Foliage” system ( see https://dev.epicgames.com/documentation/en-us/unreal-engine/procedural-foliage-tool-in-unreal-engine ) which is the opposite of the “Landscape” system used for grass. Essentially it lets you spawn hundreds of a single actor and handles it externally from the normal actors.

The trees now have collisions!

The first thing I wanted to try getting working was having bits break off of the tree.

This can be done using unreal’s chaos destruction but I’m still messing around with the parameters. I tried the current tree and it just kinda falls apart really quick:

My hope is that when your running through the woods getting shot at a bunch of splinters will be flying through the air as bullets hit trees.

When applied to the whole forest you get a cool view of all of the tree’s falling apart slowly.

Maybe that would be cool for a menu or something, but really I need to make the chunks smaller and fix the split apart trigger so it doesnt just magically explode.